Passkey Public Preview for Entra ID
With the release of the public preview for Passkey in Entra ID, I think, the broad adoption of passwordless and phishing resistant authentication adoption in the enterprise is coming close. Of course we had phishing resistant, passwordless methods available before. FIDO2 security keys are already a supported way to sign-in to Entra ID. But realistically this was always just for the technical savvy, the admins and power users and there were still limitations on mobile platforms.
But why should this change now and how can you prepare? Let me share my opinion in this post.
WebAuthn, FIDO2, CTAP2 & passkeys?
If you don’t want to get into too much technical details, or want to skip the history lessons, jump to the next section.
There are multiple names and buzzwords around when talking about passwordless authentication. But when peeling away the layers of the onion it’s not that difficult.
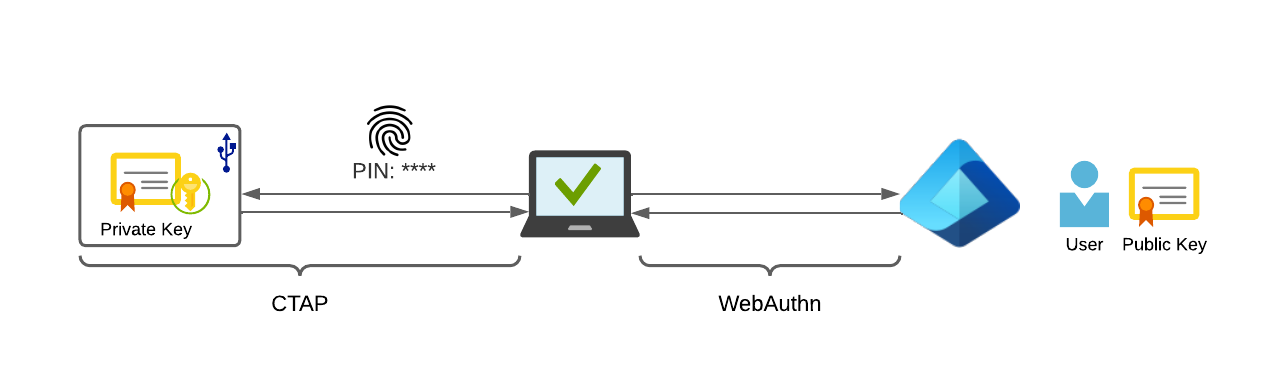
WebAuthn, short for Web Authentication, is a standard developed by many industry leaders (Microsoft, Yubico, Google, Mozilla, PayPal, and more) and published by the W3C.
It’s the technical definition of how the authentication from a client to a web service, or more correct a relying party, should work without the requirement of a password.
FIDO2 itself is the next evolution of FIDO U2F, which only was useful as a second factor, but could not be used for the whole authentication flow. It was developed by the FIDO Alliance and the W3C and at its core is a way to store credentials that can be used to authenticate using WebAuthn.
To store those credentials on e.g. a hardware FIDO2 security key the Client to Authenticator Protocol (CTAP2) is required. It’s the connection between the client (e.g. a web browser) and the FIDO2 security key itself. This protocol is used if you connect any hardware security key to either your computer or smartphone.
And what are passkeys? The name passkeys was, as far as I could track it down, first publicly used by Apple at the WWDC21 (June 2021). Yubico as a member of the FIDO alliance used the same term in March of 2022 in their blog post “YubiKeys, passkeys and the future of modern authentication” as a replacement for “WebAuthn/FIDO credentials”. Passkeys should not only replace passwords as a way to authenticate but also in the minds of users.
And I think we can all agree that passkey is a much simpler term to use than WebAuthn credentials.
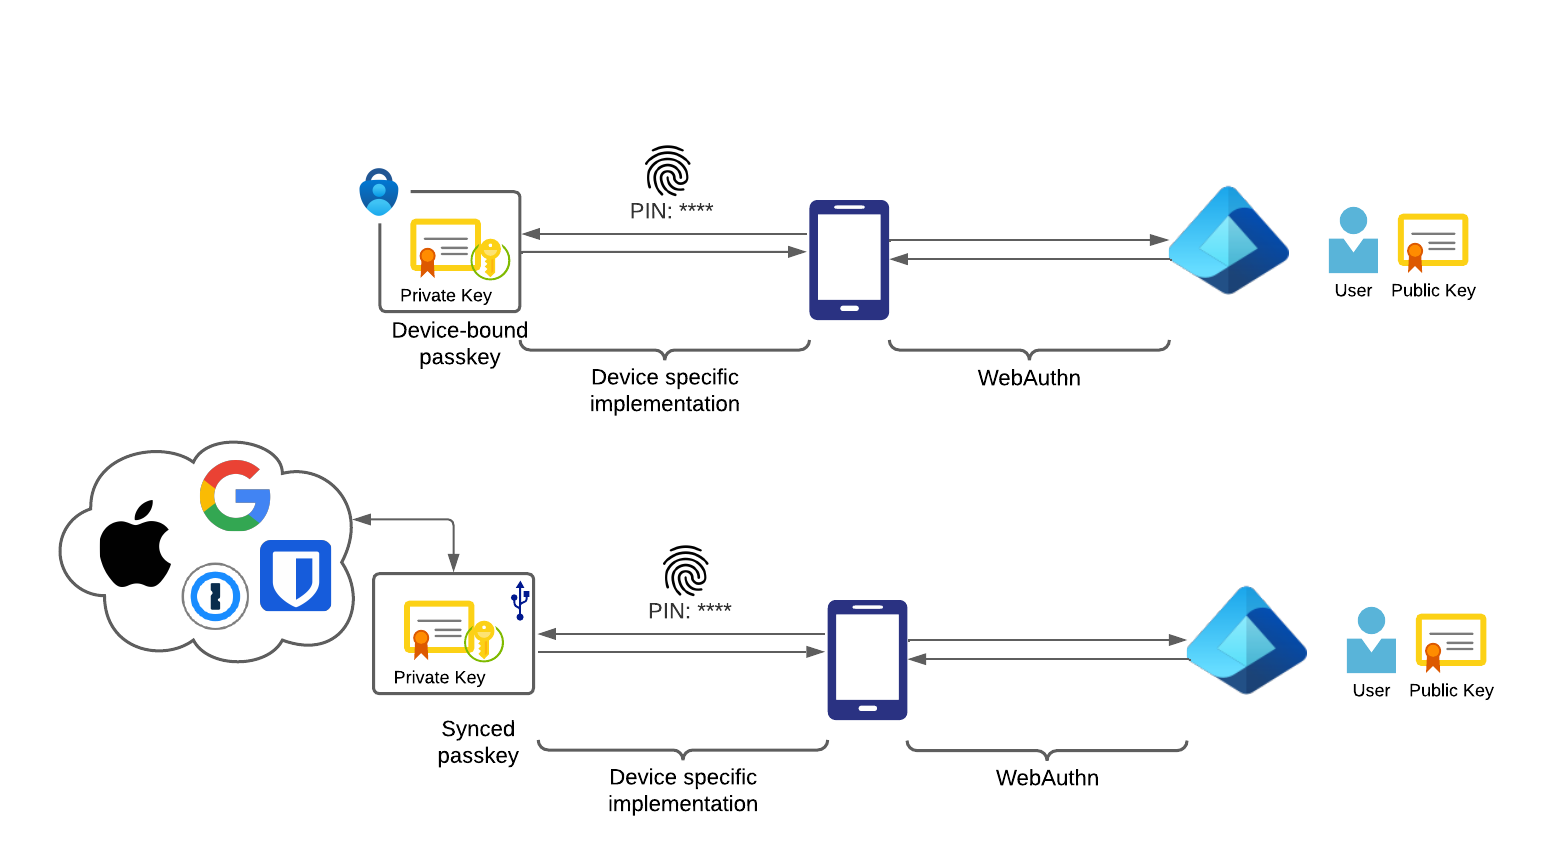
So basically it’s just a fancy marketing term for WebAuthn/FIDO2 but with a twist. While a discoverable FIDO2 credential on a hardware security key is by it’s nature device-bound a passkey is not. The industry, especially Apple and Google, are pushing for synced passkeys. The credentials are not only stored on your device, but also at the cloud provider or a third-party passkey manager.
This makes this kind of credential very secure for authentication but also the risk of losing it is drastically minimized. While you can now loose your phone, you will get back your passkeys.
The current Entra ID preview is limited to device-bound passkeys living in the Microsoft Authenticator app. While this approach is not as convenient as a synced passkey it’s much more secure. The compromise of the personal account of your employees is now not also the compromise of their corporate identity. The device-bound passkey is stored safely just on this smartphone and your will need the PIN or biometrics to use it.
Why are passkeys better?
I already covered this topic in my series on passwordless as well as in the post “Why using a FIDO2 security key is important”. If you don’t want to read those articles first here is the TL;DR
- Device-bound Passkeys never send any sensitive information over the wire. Opposed to passwords, the private key is always stored securely in a hardware enclave.
- Passkeys are phishing resistant. Even if an attacker lures the victim to a phishing website, the way the authentication method works, the user can’t expose any secret nor successfully sign-in.
- Passkeys are convenient. A PIN code or biometrics safeguards the private key which results in a sign-in behavior that requires a short interaction of the user, but there is not a password to forget or reuse. As long as the user can use their mobile phone or security key, they will be able to sign-in.
Prerequisites
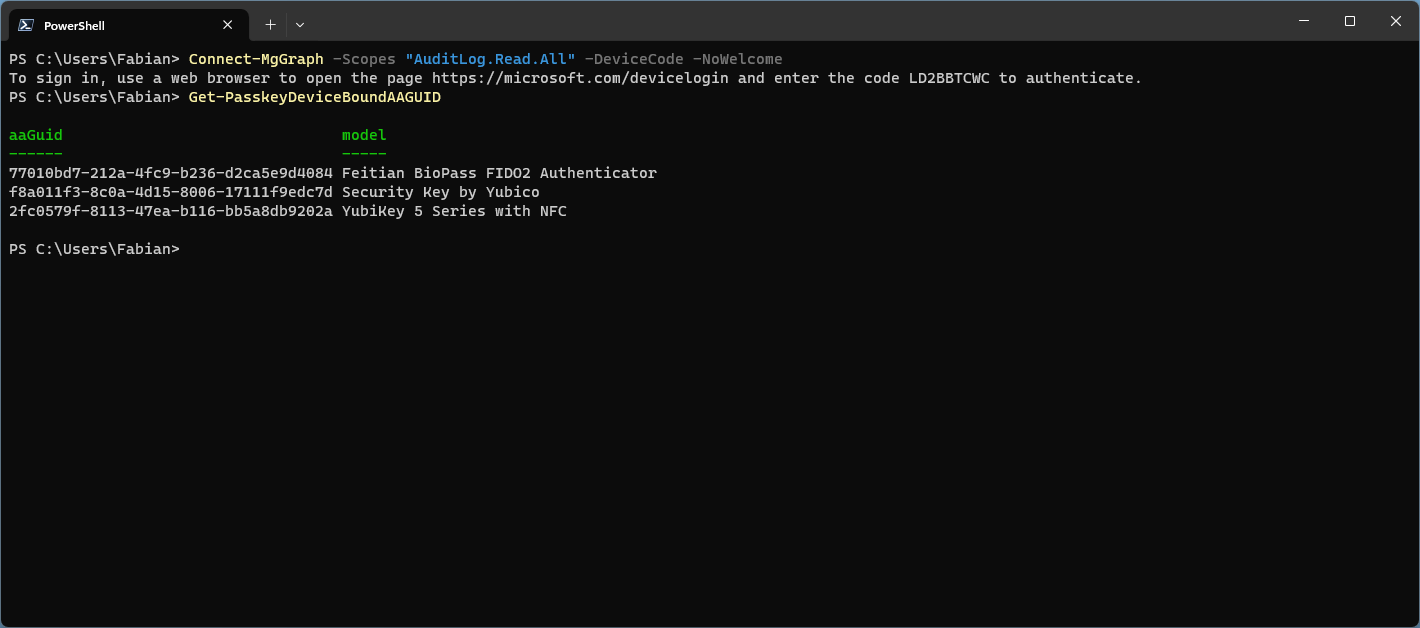
Microsoft released MC690185 (Archive) in the M365 admin message center with all information about the public preview. As one key requirement to participate in the public preview you must, even if that sounds unintuitive at first, restrict the allowed passkeys in your tenant to certain AAGUIDs.
What’s an AAGUID you might ask, let’s take a quick detour.
AAGUIDs
An Authenticator Attestation Global Unique Identifier is a unique GUID that identifies the make and model of a passkey. For this identifier to be secure the passkey must support attestation, which is quite normal when we talk about device bound passkeys in form of security key, but it’s not something provided by passkeys created by Apple nor Google.
If you already used FIDO2 security keys in the past and have no AAGUID restrictions in place, it’s required to get a complete list of all registered AAGUIDs in your tenant and add them to the list of allowed AAGUIDs to not break the experience for existing or new passkey users.
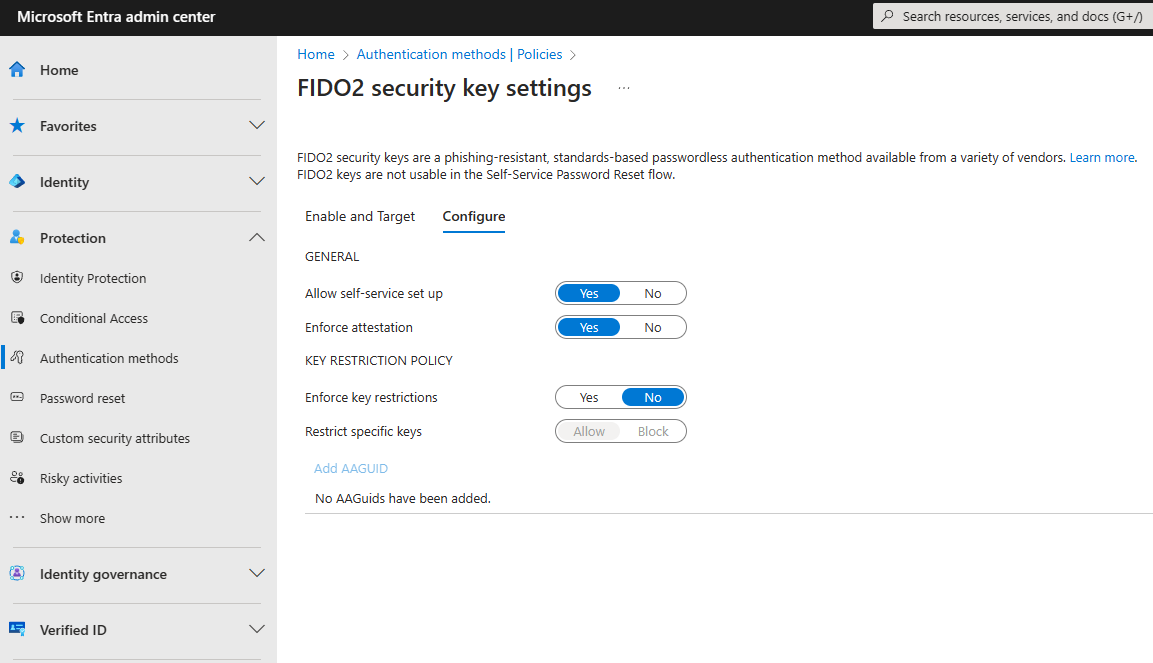
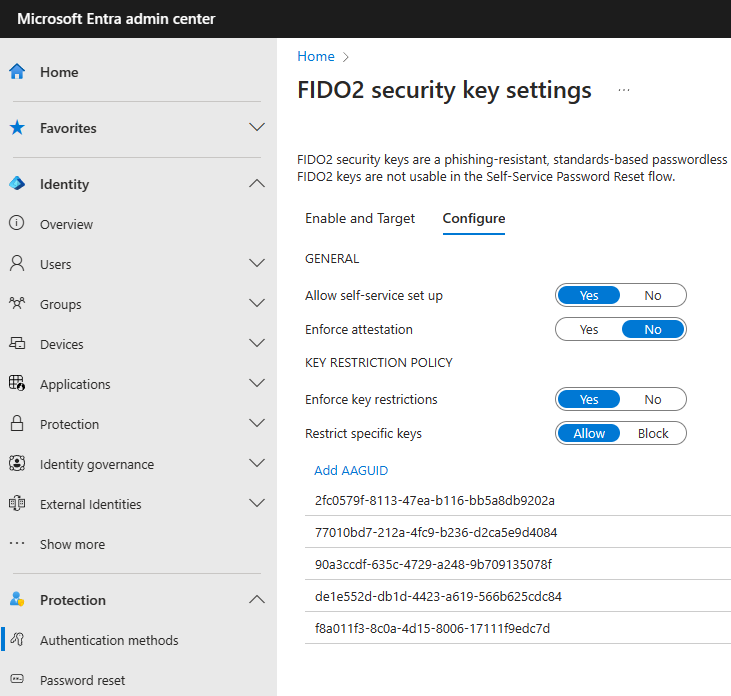
In most tenants there are most likely no restrictions configured, as shown in the screenshot.
To make the process of enrolling into the public preview as easy as possible I wrote a PowerShell module that will do the heavy lifting for you. More about this module in a second.
Microft Authenticator AAGUIDs
Here is the complete overview of the new AAGUIDs you can add for the different device-bound passkeys available in Microsoft Authenticator.
| AAGUID | Device |
|---|---|
| 90a3ccdf-635c-4729-a248-9b709135078f | iOS Microsoft Authenticator device bound passkey |
| de1e552d-db1d-4423-a619-566b625cdc84 | Android Microsoft Authenticator device bound passkey |
EntraIDPasskeyHelper
As the name implies, this module should help you with Entra ID passkeys.
It can be downloaded from the PowerShell Gallery or GitHub.
This module contains two cmdlets
Get-PasskeyDeviceBoundAAGUIDGets you a list of all AAGUIDs that are already in use in your tenantSet-PasskeyAuthenticationMethodsPolicyConfigure the authentication method policy for you with all the required settings to participate in the preview
Enable the preview in easy mode
You just need to install the module EntraIDPasskeyHelper from the PowerShell gallery, connect to MIcrosoft Graph with the correct permission scope and run the cmdlets as outlined below.
Install-Module EntraIDPasskeyHelper -Scope CurrentUser

Connect-MgGraph -Scopes "AuditLog.Read.All", "Policy.ReadWrite.AuthenticationMethod", "User.Read.All", "UserAuthenticationMethod.Read.All" -NoWelcome

Get-PasskeyDeviceBoundAAGUID | Set-PasskeyAuthenticationMethodsPolicy -MicrosoftAAGUIDsAllowed 'All' -Verbose
This will gather information about every FIDO2 AAGUID in your tenant and configure, based on this information, the FIDO2 security key settings in the Authentication methods policy.
- Enforce passkey attestation will be disabled (only until it’s supported)
- Key restrictions will be enabled
- The Microsoft AAGUIDs and your existing AAGUIDs will be added as allowed passkeys
Get-PasskeyDeviceBoundAAGUID, requires an Entra ID P1 or P2 license. If you have a free tenant, all users will be checked, which can be a bit slow.Manual mode
If you don’t want to use the script to change the authentication policy you can use the cmdlet Get-PasskeyDeviceBoundAAGUID on it’s own just to gather the required information.
Next open the Microsoft Entra admin portal. Select Protection, Authentication methods, Policies, FIDO2 security key and switch to Configure.
- Disable “Enforce attestation”
- Enable “Enforce key restrictions” and set it to “Allow”
- Add all the AAGUIDs you like to allow to the list
This is all the configuration you have to setup in your environment. After some time your users will now have the ability to register a new passkey.
Please note that you users must have the most recent version of the Microsoft Authenticator app on iOS and Android installed.
On iOS the minimum OS version is 17.
On Android smartphones with Android 14.
Enrollment
Now that you have enabled your tenant for the preview you can start enrolling Passkeys. I will not cover this in too much depth but let me walk you through the two options.
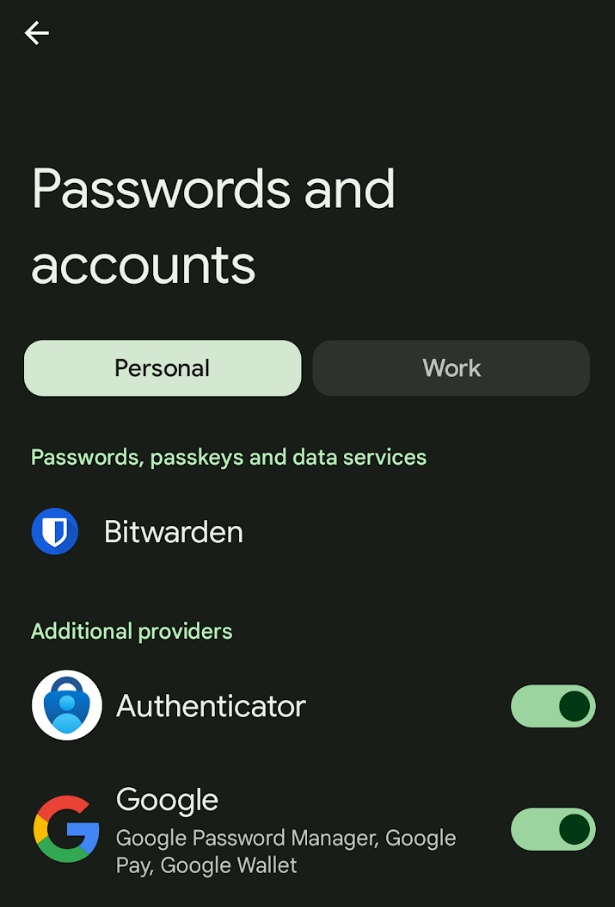
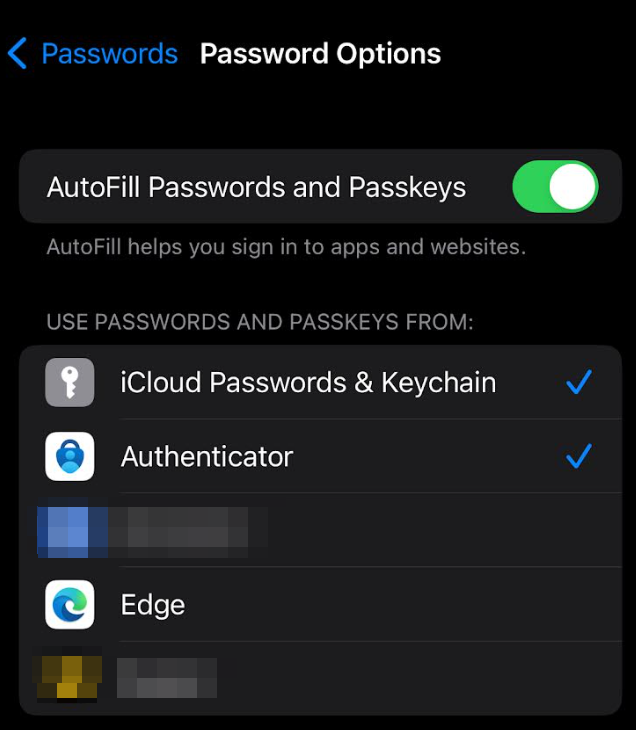
When you want to use cross device setup you must first make sure that you enable Microsoft Authenticator as a third party passkey provider.
On Android go to Settings, Passwords and accounts, and select Authenticator as a additional provider.
On iOS go to Settings, Passwords, Password Options and enable Authenticator.
Same device registration
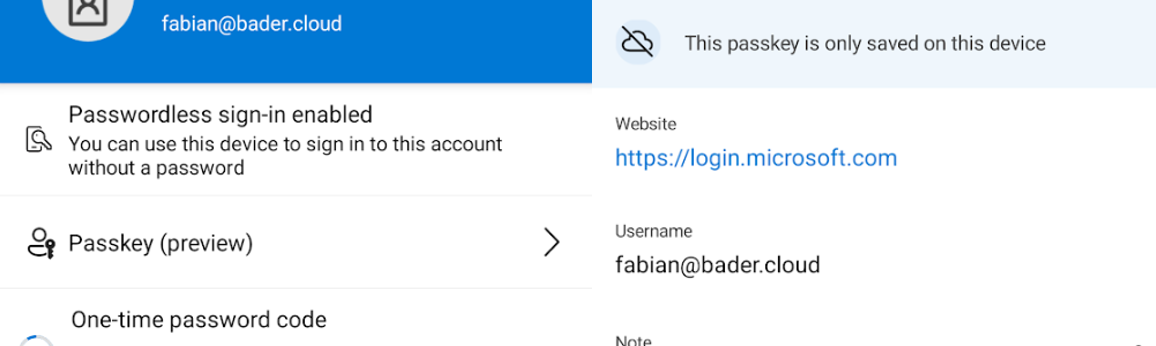
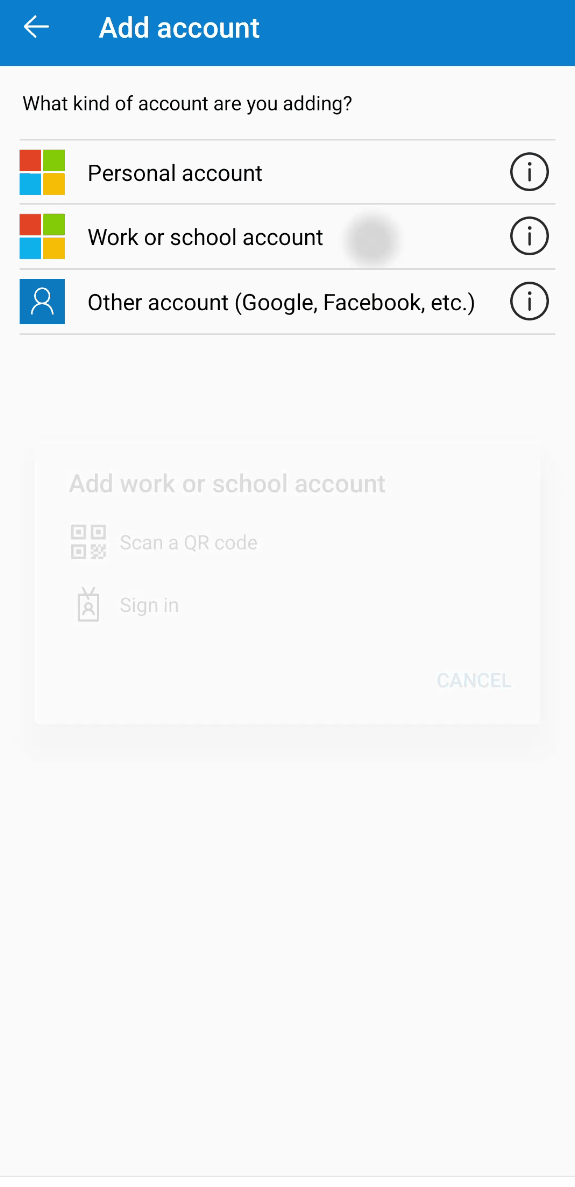
On your smartphone open the Authenticator app, “Add account”, “Work or school account”, and then “Sign in”. If you don’t want you can skip the device registration, as it’s only required for passwordless phone-sign in.
Now you have registered your first passkey and can sign in using it on the device and also cross devices.
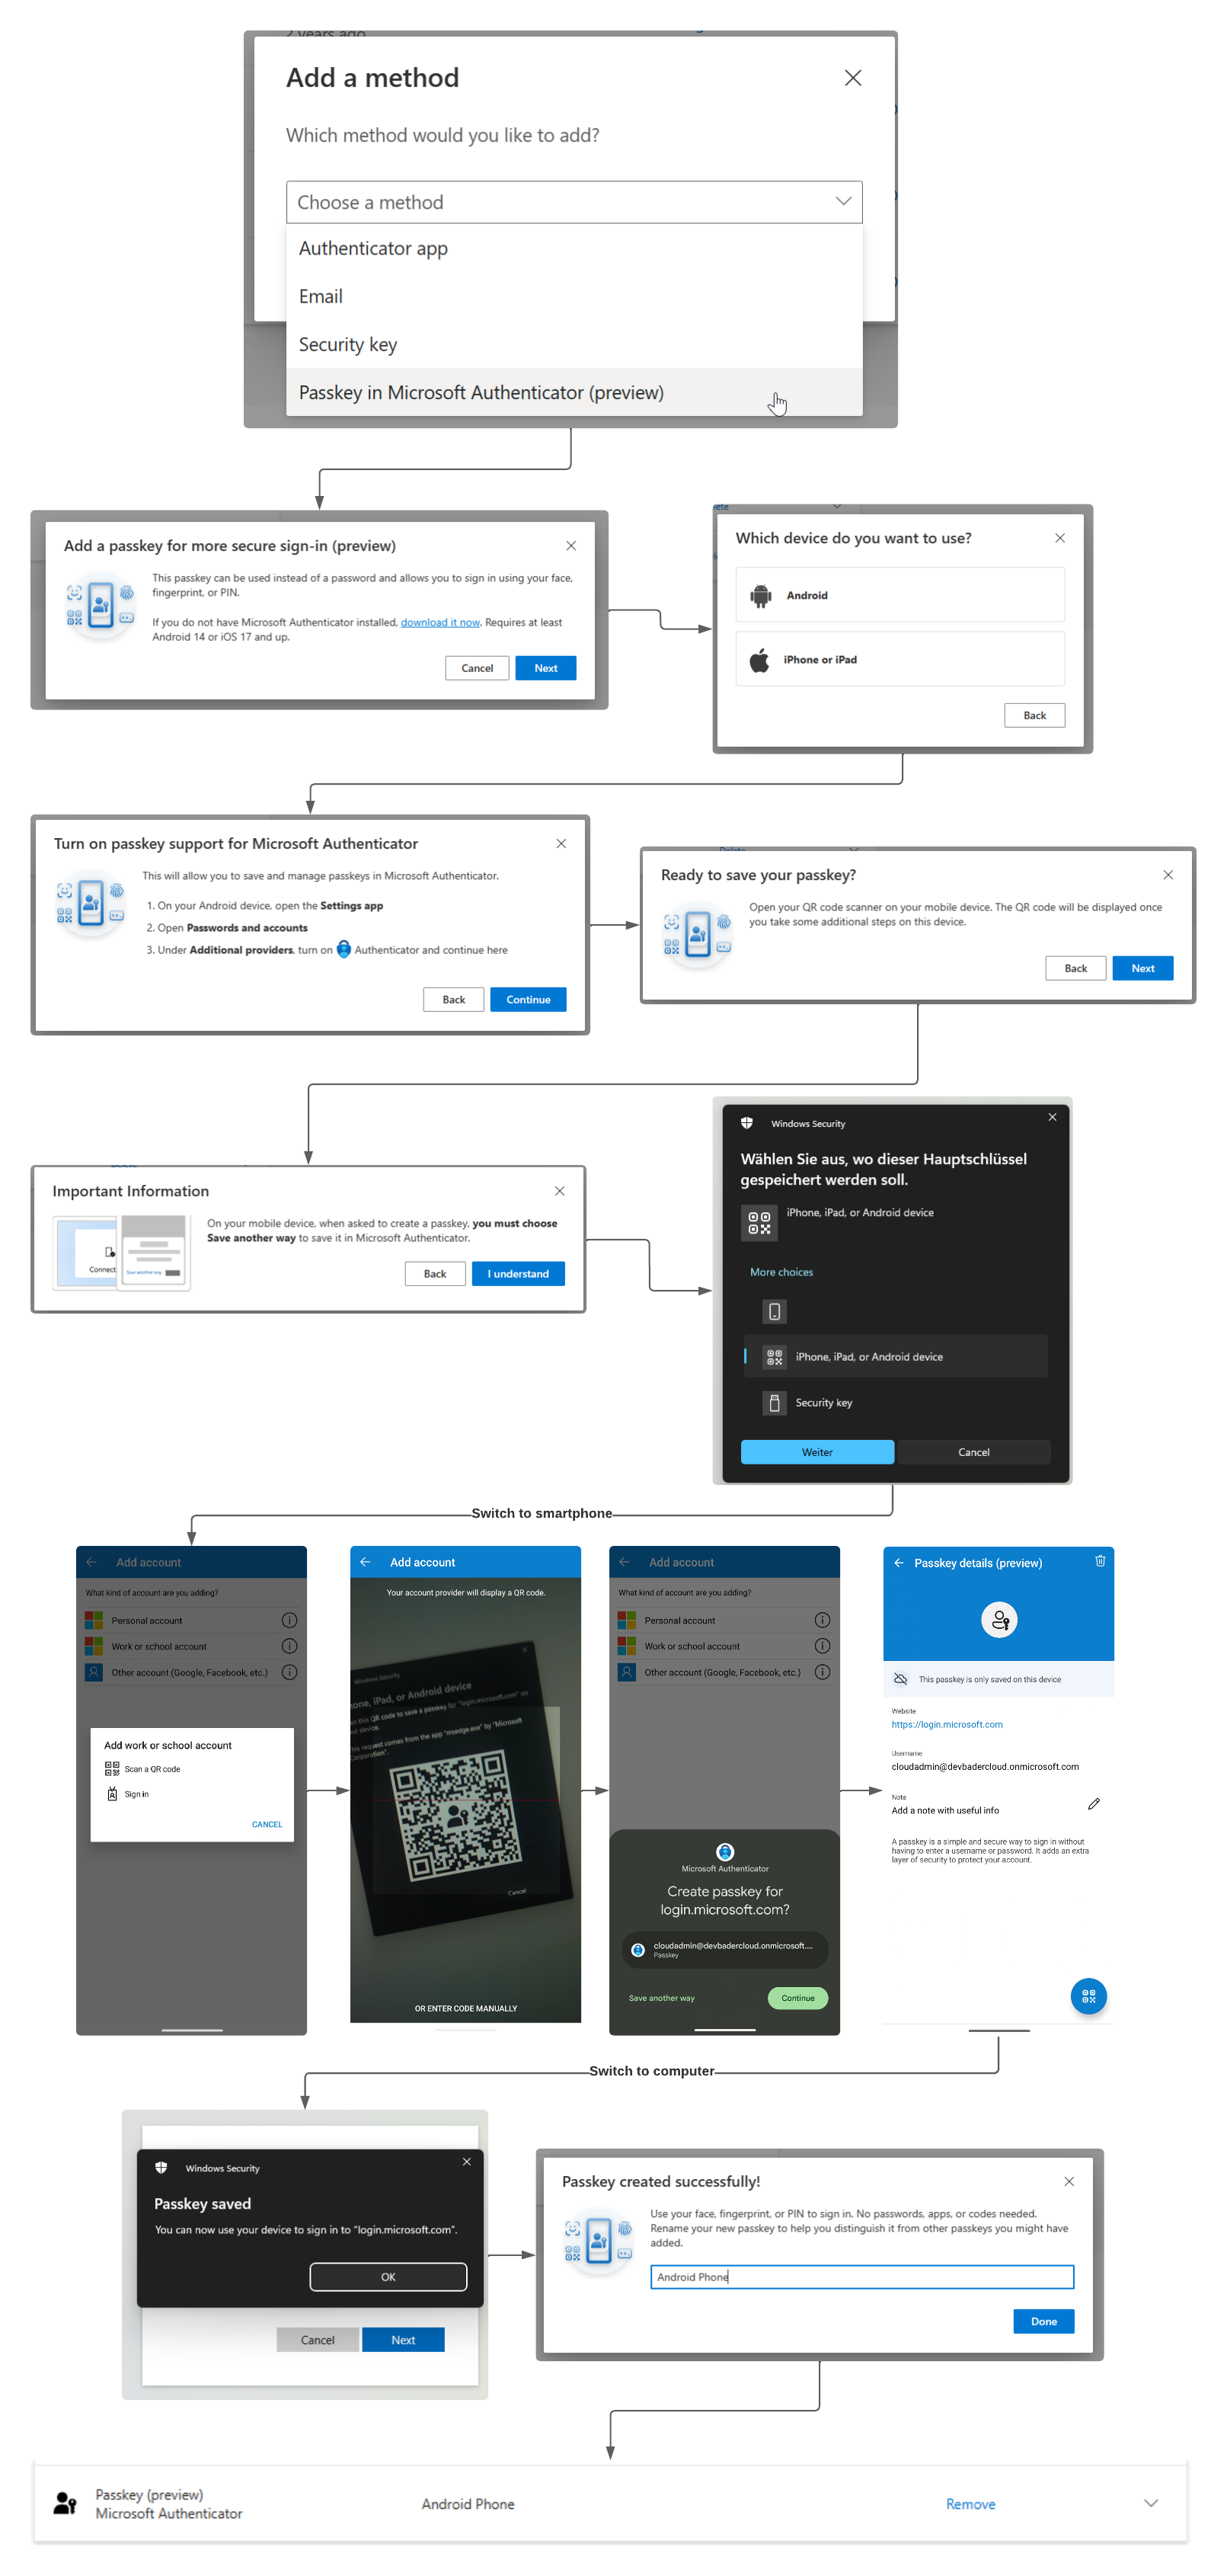
Cross device registration
When you do this type of registration you will use you computer and smartphone at the same time. Please make sure that Bluetooth is enabled on both, as it’s a requirement to check for the phones proximity.
Visit aka.ms/mysecurityinfo and select “Passkey in Microsoft Authenticator (preview)”, “Add”, “Next” and then follow the steps outlined on the screen.
At some point you will have to switch to the authenticator app on your smartphone and scan the QR code on the computer screen. After you phone and computer have established that they are close by using Bluetooth (to prevent phishing) you will be asked to save the passkey in the authenticator app. After the passkey is saved, switch back to the computer and finish the setup, otherwise the passkey is not stored in Entra ID.
I outlined the process when using an Android phone here, as you can see it’s not as easy as the same device registration.
Conclusion
Passkeys will make the Entra ID ecosystem more secure and because they are not limited to it, will have wider adoption than other two-factor methods. Because when somebody is already used to sign in to Netflix, Amazon and PayPal using a passkey, it’s not that much different for the enterprise account.
In the current implementation the initial setup process for the enduser is super simple, as long as they are using same device registration for first setup. Cross-device registration involves many steps and it can go sideways fast. If you plan a rollout, stick with same device registration, maybe using a TAP.
Since currently it’s only device bound passkeys that are supported, not much has changed in comparison to hardware FIDO2 security keys. Should, at any time in the future, Microsoft decide to also allow the enrollment of synced passkeys you should think hard about which users you want to allow this type of credential. I wouldn’t recommend it for any administrative or sensitive accounts. Stick to device bound passkeys for those, as a compromised personal account should not impact you tenant security.
Additional references
- Enable passkeys for your organization - Microsoft Learn
- Register a passkey - Microsoft Learn
- Register a passkey using a mobile device - Microsoft Learn
- Quick overview of WebAuthn FIDO2 and CTAP
- What are passkeys?
- https://passkeys.dev/docs/reference/terms/
- YubiKeys, passkeys and the future of modern authentication
- Apple - Move beyond passwords
- WebAuthn Relying Party
- Passkey Provider AAGUIDs
- https://aaguid.nicolasuter.ch/
- Support for passkeys in Windows
- BLUETOOTH_PASSKEY_INFO structure (bluetoothapis.h)